Sunday, April 24, 2011
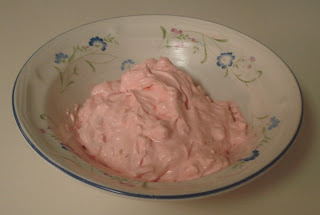
Yummy Pink Stuff
This is so yummy! Hence, the name "Yummy Pink Stuff"! My brother-in-law's mother brought this to Easter dinner today, and it was a huge hit. I'm a pineapple lover, so you know I had to love it! It is a family favorite at her house. (Thanks, Margie, for sharing the recipe!)
Yummy Pink Stuff
Ingredients:
1 small package strawberry Jell-O
8 ounces sour cream
12 ounces Cool Whip
1 can (20 ounce) crushed pineapple, drained
Place crushed pineapple in strainer and allow to sit and drain.
Whisk together Jell-O and sour cream until well blended. Add Cool Whip and whisk until blended. Fold in drained pineapple.
Chill until ready to serve.
Notes:
You can use any flavor Jell-O.
Sugar-free Jell-O works, too.
Thursday, April 21, 2011
Edible Bird's Nest
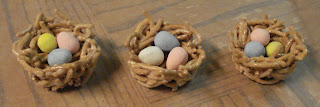
So I was looking for a cute Easter gift for the girls I teach at church. I found this adorable little bird's nest!
Here are the instructions for making the nest.
Bird's Nest
Ingredients:
2 cups miniature marshmallows
¼ cup butter
1 (6-ounce) package chow mein noodles
36 Mini Cadbury Eggs (or any egg shaped candy)
Place the chow mein noodles in a large, plastic mixing bowl and set aside.
Butter each cup of a 12-cup muffin pan.
Place the butter in the Pampered Chef large micro-cooker (or you can use any medium sized microwaveable bowl), and microwave until melted (about 60 seconds). Add the marshmallows to the melted butter and microwave for about 45 seconds. Remove from the microwave and stir marshmallows and butter together until smooth and mixed well. (Use a plastic scraper or spoon to do the stirring, so the marshmallow doesn't stick as much.)
Pour the marshmallow mixture over the noodles, and fold gently until all the noodles are coated evenly.
Butter your fingers, and press mixture on bottom and up sides of each buttered cup leaving a well for eggs. Place 3 Mini Cadbury Eggs in each nest. (It looks better if you use three different colored eggs.)
Refrigerate at least two hours or until firm. Remove from refrigerator. Let nests sit at room temperature for about 10 minutes; remove nests from cups.
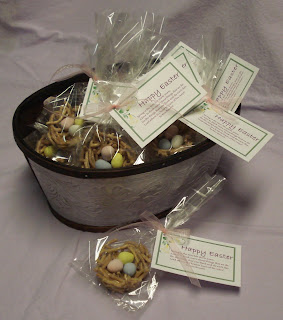
I placed my nests in a cellophane bag with a twist tie. I wanted to have a cute poem or saying attached, but could not find the right one... so... I wrote my own.
A time to think more about things that we do.
Do the things that you think and do each day,
Lead others to Christ to learn of His ways?
∼ by Kim Bennett ∼
I think the poem was the perfect touch to make this gift special!! You can print out the tags I made with the poem here.
These are so cute! I can't wait to give them to my girls!
Notes:
If you want to make the nests using the stove top, combine marshmallows and butter in 2-quart saucepan; cook over low heat, stirring occasionally, until melted (6 to 8 minutes). Stir in noodles until very well coated. Proceed as above.
Friday, April 15, 2011
Apple Crisp
This is such a yummy dessert! It is much like an apple carmel topping, and we love to eat it on top of our vanilla ice cream! I took it to my parents house to share with my family. They were licking the dish clean and wishing for more. (That is always a sign that your dish is a hit!)
Apple Crisp
Ingredients:
10 cups apples, peeled & cubed
1¼ cups sugar
2 Tablespoons Fruit Fresh
1 Tablespoon cinnamon
½ cup flour
Topping:
½ cup sugar
¼ cup flour
½ cup quick rolled oats
½ teaspoon cinnamon
4 Tablespoon butter, softened
Preheat oven to 375 degrees.
Wash, peel and cube enough apples to make about 10 cups. In a separate bowl, combine sugar, Fruit Fresh, cinnamon, and flour. Mix well. Add to apples and mix with hands until all apples are coated. Let sit for 15 minutes while making the topping.
To make topping, combine sugar, four, oats, & cinnamon in clean dry bowl. Cut in butter, until all ingredients are moist and crumby.
Place apples in large 3 or 4 quart casserole dish. Place topping over apples.
Cover and bake at 375 degrees for 35 minutes. Uncover and bake an additional 25 minutes. Let sit for 10 or 15 minutes before serving.
Notes:
- I used Granny Smith apples for this recipe. They tend to be a little tart, so if you use a sweet apple, you might want to decrease the sugar a little.
- The apples do cook down, so after you let it sit, you have about half the amount you started with.
- You can half this recipe, but I would still make the full topping amount. You could also split the recipe between two smaller baking dishes, but then I would probably make double the topping. Yes, the topping is that good!
Thursday, April 14, 2011
Cookie Gift
This an easy but yummy gift idea! Who doesn't like homemade cookies? What makes this gift so special is the cute poem attached!
I helped make these for all the father's at church for Father's Day last year. We made Chocolate Chip Cookies using the Pampered Chef medium cookie scoop (2 tablespoons). We baked them at 375 degrees on parchment covered baking stones for about 15 minutes.
After cooling completely, each was wrapped individually in pastic wrap. We then attached our cute cookie label with the poem I wrote. The tags were printed on ivory cardstock and cut out using the FISKARS Shapecutting blade and the Vacation-1 (#4863) template (Lens/Sun - 1⅞ inches circle) shown below. (You will need a cutting mat with this as well.)
I think a 2 inch punch or circle cutter would also work since the cookie labels are 1¾ inch in diameter.
Here is the cute poem! Please include "by Kim Bennett" if you use it!
A special cookie just for you,
To thank you for the things you do.
It's made with love and tender care,
Both of which you often share.
A little gift which helps us say,
We hope you have a special day!
∼ by Kim Bennett ∼
Here is another poem that would be cute to use if you make peanut butter cookies with Hershey kisses in them. I found this one online... not sure who wrote it.
On this special Father's Day,
We want to share this treat.
A cookie and a kiss for you
Because we think you're neat.
∼ Author Unknown ∼
I hope you enjoy these gifts ideas!
I helped make these for all the father's at church for Father's Day last year. We made Chocolate Chip Cookies using the Pampered Chef medium cookie scoop (2 tablespoons). We baked them at 375 degrees on parchment covered baking stones for about 15 minutes.
After cooling completely, each was wrapped individually in pastic wrap. We then attached our cute cookie label with the poem I wrote. The tags were printed on ivory cardstock and cut out using the FISKARS Shapecutting blade and the Vacation-1 (#4863) template (Lens/Sun - 1⅞ inches circle) shown below. (You will need a cutting mat with this as well.)
I think a 2 inch punch or circle cutter would also work since the cookie labels are 1¾ inch in diameter.
Here is the cute poem! Please include "by Kim Bennett" if you use it!
To thank you for the things you do.
It's made with love and tender care,
Both of which you often share.
A little gift which helps us say,
We hope you have a special day!
∼ by Kim Bennett ∼
Here is another poem that would be cute to use if you make peanut butter cookies with Hershey kisses in them. I found this one online... not sure who wrote it.
We want to share this treat.
A cookie and a kiss for you
Because we think you're neat.
∼ Author Unknown ∼
I hope you enjoy these gifts ideas!
"Father's White Shirt"
So I loved the little Origami shirts and ties so much, and so did the girls in my class at church. They wanted to learn to make them, so we decided to make them as gifts for Father's Day for all the fathers at church. We knew we needed a cute poem to go with them. Here is the poem we decided to use. One of the women at our church wrote it for us, so please give the credit to her if you use the poem, too! We placed the poem inside the shirt along with a Twix candy bar!
"Father’s White Shirt"
A Father’s white shirt is not always white.
It can be blue, grey or green, or dark as the night.
Soldier or sailor, banker or fireman,
Fathers work hard to meet life’s demands.
A Father’s job is to teach us the right,
To keep away monsters in the dead of the night,
To provide all that’s needed for our family.
(Plus give me great hugs when I sit on his knee.)
Shirts of all colors at home, work or play-
He’s still my White Knight at the end of the day.
∼ by Sonya Robinson ∼
Here is a PDf file of the poem perfectly sized to fit in a shirt made from an 8½" x 11" piece of paper.
Sunday, April 3, 2011
Oragami Shirt & Tie
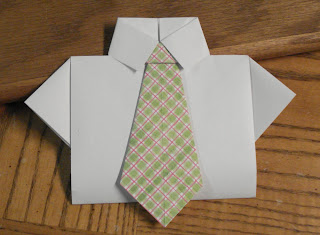
I found a cute handout that I wanted to use to go with my lesson next week at church. It was made using an Oragami shirt and tie. I searched through many YouTube videos until I finally found a pattern for a shirt and one for a tie that I really liked. Because it took me so long to figure out how to do this, I thought it might be nice to make an instructional video on each to help out anyone else in my predicament!
This would be an adorable card for Father's Day as well!!
Here is the video showing how you make an Oragami shirt.
Here is the video showing how you make an Oragami tie to go with your shirt.
I used some double stick tape in a few places to help my shirt an dtie hold thier shapes really well.
For those who want to use this as a handout for YW Manual 3 Lesson 13, you can view the handout idea at Tales of a Trophy Wife's Blog. I just wrote the words on my tie by hand, but I did make a PDF file of the "Father's Responsibilities" to put on the inside.
Other posts you might like:
"Father's White Shirt"
Peanut Butter Fudge Cheesecake
This yummy dessert is from a church friend. She made if for a church social, and everyone loved it! Thanks for sharing the recipe, Sue!
Peanut Butter Fudge Cheesecake
Crust Ingredients:
1⅓ cups graham cracker crumbs
⅓ cup crushed oreos
¼ cup sugar
7 Tablespoons butter, melted
¾ cup creamy peanut butter
Filling Ingredients:
3 - 8oz. cream cheese, softened
1 cup sugar
8 oz. sour cream
3 eggs
1½ teaspoons vanilla
1 cup hot fudge topping (divided - ¼ cup & ¾ cup)
Reese's peanut butter cups or ice cream topping (garnish)
Preheat oven to 350 degrees.
Mix crumbs, sugar, & melted butter. Press into bottom and up sides of a greased 9" springform pan. Bake at 350 degrees for 4 minutes. Cool.
Microwave peanut butter for 30 seconds, and spread on crust.
Mix cream cheese, sugar, & sour cream until smooth. Add eggs. Stir in vanilla. Reserve 1 cup of the filling. Pour the remaining filling into crust. Heat ¼ cup of the fudge topping for 20 seconds in the microwave. Fold hot fudge into the reserved filling. Pour this over the filling in the pan. Cut through layers of fillings with a knife to make swirls.
Place pan on a cookie sheet, and bake at 350 degrees for about 55 minutes or until center is almost set. Cool 10 minutes. Run a knife around the edges. Cool 1 hour.
Microwave remaining ¾ cup fudge topping for 30 seconds. Spread hot fudge on top. Garnish with peanut butter cups or Reese’s ice cream topping. Serves 12 to 14.
Friday, April 1, 2011
Best Ever Popcorn Balls
I needed a fun treat my my son's Christmas party, but I wanted something different and healthy. I am not usually a fan of popcorn balls, as they are hard to eat. So I began searching for a recipe for a soft and chewy popcorn ball. This recipe was terrific! The kids loved it!
Best Ever Popcorn Balls
Ingredients:
5 quarts popped popcorn
¾ cup light corn syrup
¼ cup butter
2 teaspoons cold water
2⅝ cups confectioner’s sugar
1 cup marshmallows
1 teaspoon vanilla (optional)
Food coloring (optional)
Butter for greasing hands and measuring cup
Pop the popcorn and place 5 quarts of popped popcorn in a large plastic bowl.
In a saucepan over medium heat, combine the corn syrup, butter, cold water, confectioners' sugar, and marshmallows. Heat and stir until the mixture comes to a boil. Remove from heat. (Be sure you do not overheat!)
If desired, add food coloring and vanilla and stir until mixed well.
Carefully combine the hot mixture with the popcorn, coating each kernel.
Grease hands with butter and use a buttered 1 cup measuring cup to form the balls. You will have to re-butter the measuring cup and hands each time they began to get sticky. Place balls on wax paper until cooled. Wrap with plastic wrap and store at room temperature.
Makes 12 - 15 balls.
Notes:
- I used lightly buttered microwave popcorn. It took almost 3 bags of popcorn, but be sure to measure your popcorn as it pops differently each time.
- Use a smaller measuring cup if you want smaller balls.
Sloppy Joes
I decided to make Sloppy Joes for dinner the other night. I began the process, but when I went to get those nifty sloppy joe seasoning packets from by cupboard... there were none. I've never made sloppy joes except from a ready made can or package of seasoning. I decided that there had to be a recipe for making them from scratch, so I did a google search. Lucky me! My "fix" turned out to be fantastic!! We will never use those seasoning cans and packets again for sloppy joes. Here is the recipe I found that we all loved.
Sloppy Joes
1 pound lean ground beef
¼ cup chopped onion
¼ cup chopped green bell pepper
½ teaspoon garlic powder (optional)
1 teaspoon prepared yellow mustard
¾ cup ketchup
1 Tablespoon brown sugar
salt to taste
ground black pepper to taste
In a medium skillet over medium heat, brown the ground beef, onion, and green pepper; drain off liquids.
Stir in the garlic powder, mustard, ketchup, and brown sugar; mix thoroughly. Reduce heat, and simmer for 30 minutes. Season with salt and pepper.
Notes:
- I doubled this recipe for my family of six.
- I like to brown my ground beef before I freeze it, then I just defrost it in the microwave when I need it.
- I sauted my onions and peppers in some olive oil and then added them to the defrosted beef.
- I also used frozen chopped onions and green peppers which made this a super easy and fast meal to prepare.
Blueberry Pie
I finally did it! I made a successful blueberry pie! It has taken me quite a few tries to find a recipe that my family likes and in which the pie is not runny. I took a couple of recipes I found online and tweaked things until I found what worked. The result was a hit with my family!
Blueberry Pie
Ingredients:
4 cups blueberries
½ cup sugar
⅛ teaspoon kosher salt
3 Tablespoons corn starch
1 Tablespoon orange juice
1 teaspoon orange zest
1 - 9" unbaked pie crust
Topping:
½ cup sugar
¼ cup flour
½ cup quick rolled oats
4 Tablespoons butter, softened
Preheat oven to 375 degrees.
Wash the blueberries and pat dry. If using frozen berries, let them thaw completely. Mash up half of the blueberries in a small bowl. (This is the key to getting a pie that is not runny!)
In a medium bowl, whisk together the sugar, salt, and corn starch. Add the mashed blueberries, orange juice and orange zest. Stir until combined. Let the mixture sit for 15 minutes. Fold in the whole blueberries.
Place blueberry mixture into an unbaked 9" pie shell.
To make topping, combine sugar, four, oats, & cinnamon in clean dry bowl. Cut in butter, until all ingredients are moist and crumby. Place topping over blueberry filling.
Cover entire pie with foil and bake at 375 degrees for 35 minutes. Uncover and bake an additional 25 minutes or until topping and crust is golden brown and pie is bubbly.
Notes:
You can make a lattice top if you prefer. My kids like the crumb topping!
Subscribe to:
Posts (Atom)