Sunday, September 19, 2010

Perfectly Baked Potatoes


Perfectly Baked Potato   I don't know about you, but I love potatoes! I like potatoes cooked just about any way possible. But when it comes to baked potatoes... I love a crispy, salty skin and a soft fluffy inside. I finally figured out how to make the perfect baked potato.

Perfectly Baked Potato
Ingredients:
   1 large russet potato
   olive (or canola) oil
   Kosher salt

Preheat your oven to 350 degrees F. You can bake directly on your oven rack, but I learned very quickly that I don't like to clean the oven racks when they have baked on oil. So for me... I take an old baking sheet and cover it with foil (makes clean up a breeze), and then I place a rack on top of the baking sheet. You do need the potatoes to be on a rack to get the crispy skins.

Once your rack is ready, wash the potato (or potatoes) thoroughly with a stiff brush and cold running water. Using a standard metal fork, poke 8 to 12 deep holes all over the spud, so that moisture can escape during cooking. Dry the potato (or potatoes) well.

Place about 2 tablespoons of oil in a small bowl. Rub oil onto the skin of each potato until it is throughly, but lightly coated.

Sprinkle each potato with kosher salt, and place each potato directly on the rack in the middle of the oven or on the rack that is on your baking sheet. If you place your potatoes directly on the oven rack, place a baking sheet on the lower rack to catch any drippings. If your potatoes are on a baking sheet with a rack, place the baking sheet in the middle of your oven.

Bake 1 hour or until the potato skin feels crisp but flesh beneath feels soft. I usually poke my potatoes with a fork to see if the inside is done.
Baked potatoesTo serve, create a dotted line from end to end with your fork.
Create a dotted line with your fork.Then crack the spud open by squeezing the ends towards one another.
Squeeze the potato from both ends.Your potato will pop right open. But watch out for steam.
The potato will pop open.Add a ball (or scoop) of butter and serve while piping hot!
Add a scoop of butter.Note: If you are cooking more than 4 potatoes, you’ll need to extend the cooking time by up to 15 minutes.

Monday, September 13, 2010

Peanut Butter Munchies


Peanut Butter Munchies   I discovered these awesome cookies at a church potluck yesterday! I saw chocolate and thought yum, but then I took a bite and much to my surprise, I discovered a yummy peanut butter filling inside my cookie! They were so good, I went on a mission to find out who made them to get the recipe. Luckily, Cathy, who made the cookies, brought the recipe with her and left it in the kitchen. So I actually found the recipe before I found out who made the wonderful cookies!
   I loved them so much, I came home and baked a batch so my husband could taste them, too.
   I did make a couple of modifications. I decreased the cocoa powder and increased the amount of peanut butter filling. So here is my take on Cathy's awesome cookies! Enjoy!

Peanut Butter Munchies
Ingredients:
   ½ cup butter, softened
   ½ cup sugar
   ½ cup brown sugar, packed
   ¼ cup peanut butter
   1 egg
   1 Tablespoon milk
   1 teaspoon vanilla
   1½ cups flour
   ⅓ cup unsweetened cocoa powder
   ½ teaspoon baking soda
PB filling:
   1 cup powdered sugar
   ¾ cup peanut butter

   ¼ cup sugar (for rolling balls)

Preheat oven to 350 degrees F. In a large mixing bowl, cream together butter, sugars, and ¼ cup peanut butter. Add egg, milk, and vanilla beating well. In a small bowl, combine flour, cocoa, and soda. Gradually, add the dry ingredients to the butter mixture. Use a small (1 Tbsp) cookie scoop to form chocolate balls. Set balls aside.
In a medium mixing bowl, combine powdered sugar and ¾ cup of peanut butter. Continue beating until smooth. To form into balls, use the small (1 Tbsp) cookie scoop to get dough, but then half this scoop of dough to form 2 balls. (i.e., Each small scoop makes 2 balls.)
Roll ballsOn a plate, slightly flatten a chocolate dough ball.
Flatten chocolate dough with palm of handPlace a peanut butter ball in the center of the chocolate dough.
Place PB ball in center of chocolate doughShape the chocolate dough over the peanut butter ball.
Begin shaping chocolate dough around PB ballCover the peanut butter ball completely with the chocolate dough.
Completely cover PB ballRoll the dough into a ball.
Roll into a smooth ballRepeat with all the balls. You may have more chocolate balls than peanut butter balls. This is OK. Eat them or just bake them without the filling.
Roll each finished ball in granulated sugar.
Roll ball in sugarPlace balls on a baking stone (or sheet) about 2 inches apart.
Place balls on baking stoneUse the bottom of a glass to slightly flatten each ball.
Flatten balls slightly with bottom of glassBake for 8-10 minutes or until surface of cookies is slightly cracked. Let cookies stand for 1 minute and then transfer to wire racks or plates to cool. Makes about 40 cookies.
Enjoy!

Wednesday, September 8, 2010

Motherhood: An Eternal Partnership

   If you are a mom like me, there are some days that don't quite go like you planned. In fact, some days can be very discouraging. If you are having one of those days, check out this video entitled Motherhood: An Eternal Partnership.
   This video reminds me that being a mom, while sometimes hard, is the most important job I will ever do, and the rewards are so much greater than the few disappointments!

Tuesday, August 24, 2010

Scripture Story Kits

   I wish I could take credit for this fun kit, but the idea came off of sugardoodle.net. I did, however, take the idea and put it to paper... literally. I am including the downloadable files that I created to make the kit. This is a great idea to aid in scripture study as a family!
   Each kit contains two cards. The cards contain a list of items found in your bag, i.e. kit. One person picks an item out of the bag, and then finds it on the card. Next to the item is a story or event from the scriptures along with the scripture references to read about it.
   My children had so much fun looking for the items on the list to include in the bag. I was surprised at how many items they found! For those they couldn't find, we just used clipart printed onto cardstock, cut each item out, laminated them, and cut each item out again.
   These are very inexpensive to make and make wonderful gifts for families with little ones. They are even great for grandparents to have when the grandkids come to visit!
   I do plan to include some pictures soon with more detailed instructions for making the drawstring bags to hold the cards and items. There are brief instructions included in the kit files for making the bags. Be sure to read the instructions in the kit file about printing!

    Clipart for Scripture Story Kits
    Bible Story Kit
    Scripture Story Kit - LDS Edition

   We already had one family night activity using our Scripture Kit and it was a huge success! We had some great teaching moments with our children. I hope you will find this beneficial for those special children in your life as well.
    

Sunday, August 15, 2010

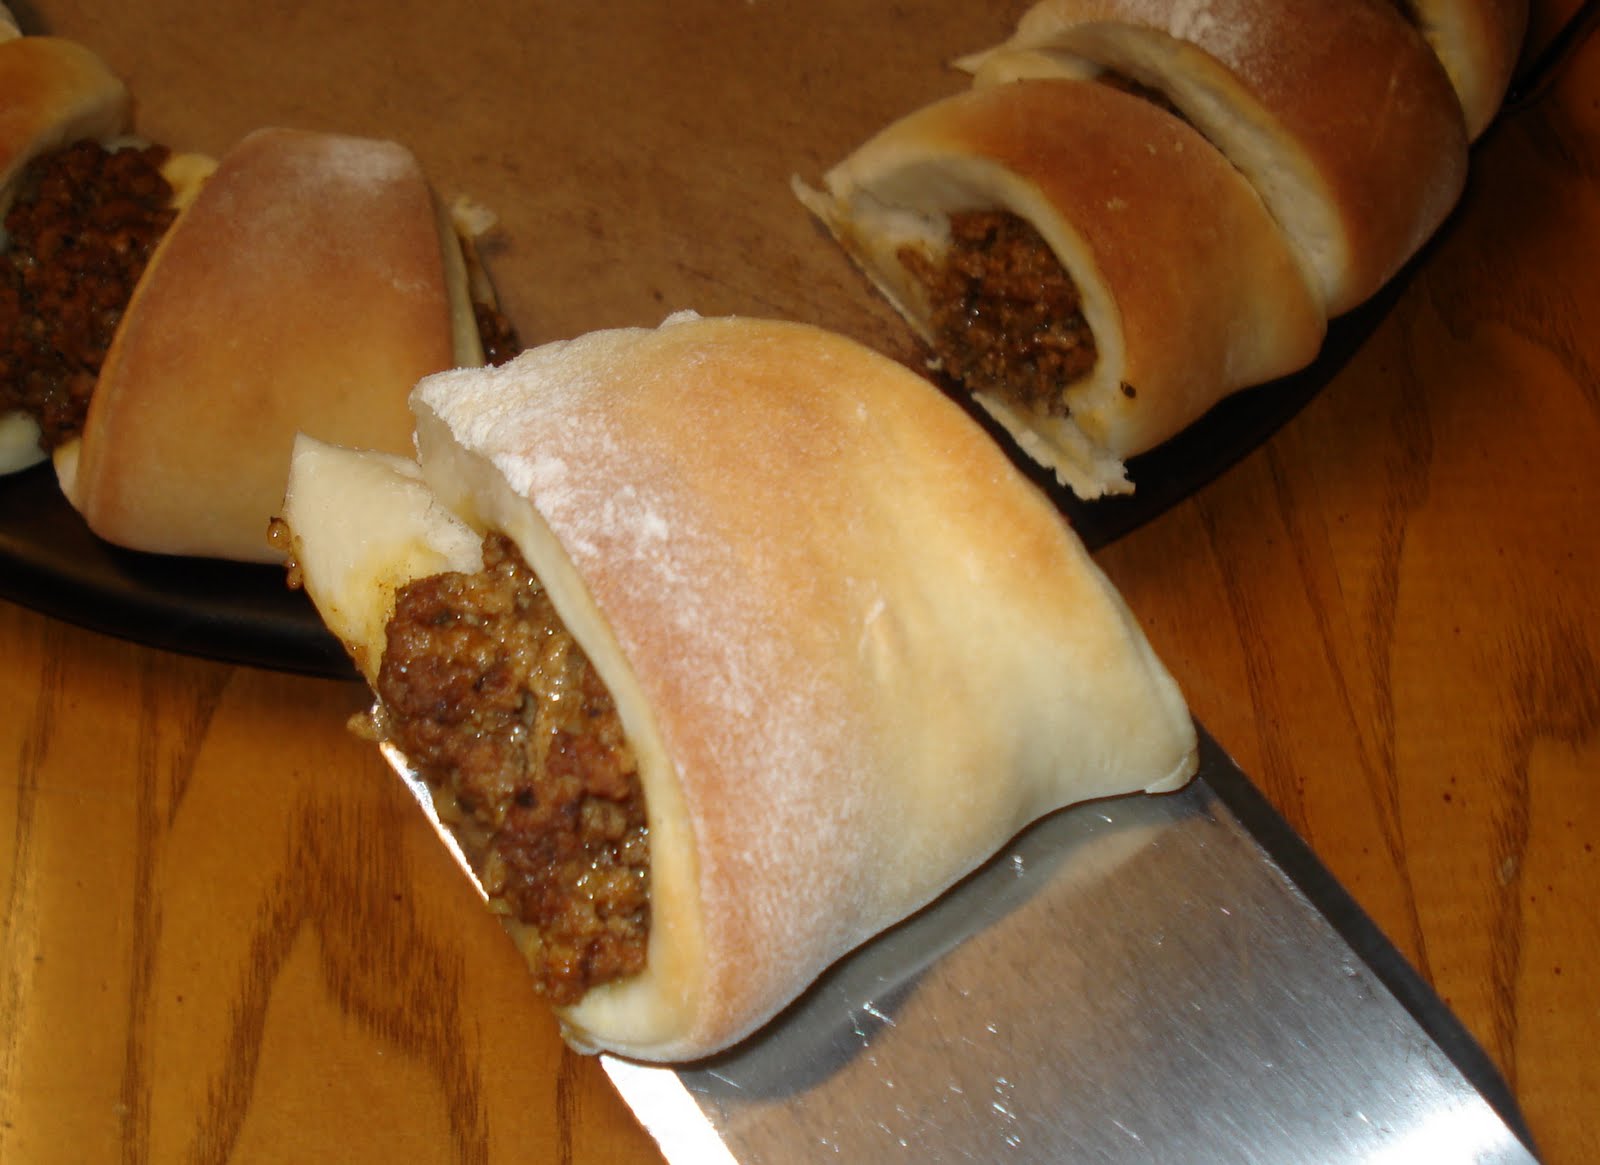
Taco Ring


Taco Ring   So this is another family favorite! This was inspired by a Pampered Chef show a while back. My kids love tacos and rolls, so it just made sense to put the two together in a fun way.
   These are great leftover and a fun, different thing for the kids lunches for school!
   You can use 2 cans of store bought crescent rolls for this, but it is way better if you use my 60 Minute Dinner Rolls recipe. I always double the recipe of rolls to make this ring.

Taco Ring
Ingredients:
   2 Recipes of 60 Minute Dinner Rolls
   1 pound of ground beef, browned and drained
   1 packet of Taco seasoning
   ¾ cup of water
   1 cup cheddar cheese, finely shredded
Prepare 2 batches of 60 Minute Dinner Rolls.
While dough is rising, prepare beef and drain. Add taco seasoning packet and ¾ cup of water and simmer on low.
Beef mixture simmeringOnce dough has risen, half dough and then continue following instructions for making rolls, but do not brush with butter. After cutting first half of dough into 12 wedges, place the first roll on a round baking stone (I use a 15" stone) so that it is partially off the stone and the point of the wedge is hanging off the stone.
Place first roll on the stoneContinue to place rolls on the stone around the edge, but overlap them slightly, and press down where they overlap to join them together a little better.
Continue overlapping rolls around stoneWhen you run out of wedges, roll out the other half of the dough and repeat until your circle is complete. I never use all the rolls. It usually takes about 18 rolls to make a circle, but it will depend on your stone size and how much you overlap them.
Complete circle of rollsAfter your circle of rolls is complete, remove beef from heat and add cheese.
Add cheese to beefWork quickly after adding the cheese to the meat.
Mix cheese & meat together quicklyUse a small cookie scoop (1 tablespoon), to measure beef mixture. I usually scoop it up the side of the pan to really press the meat together to hold it's shape.Use a small cookie scoop to measure beefPlace one scoop of meat onto each roll. I usually have more meat left, so I go back around the circle filling in any bare looking spots.
Place a scoop of meat on each rollNow grab the pointed end of a roll and wrap it around the beef.
Wrap roll around beefTuck the pointed end under the inside of your ring.
Tuck point of roll under inside of ringContinue until all rolls are wrapped and tucked.
Repeat for all the rollsAs I said earlier, I usually have a few extra rolls, so I just roll them up (without butter) and place them in the center of the ring to bake.
Extra rolls are put in the centerNow cover the entire ring with a towel and place in a warm place to rise (about 10 minutes). Also, preheat your oven to 350 degrees F.
Cover and let riseOnce rolls are about doubled in size, they are ready to bake.
Risen ringBake for about 20 minutes until the ring is a nice golden brown.
Baked ringSlice between each roll.
Slice between rollsAnd serve!
ServeI hope your family enjoys this one as much as mine does!

Thursday, August 12, 2010

Frozen Blueberries

   My children and I have been blueberry picking several times this summer. They don't love to pick the berries, but they sure love to eat them. They love them straight from the freezer!
   The proper way to freeze blueberries, so to pick them, place them in freezer Ziplock bags, and put them in the freezer. That's right... you don't wash them.
   When you are ready to use the blueberries, just wash them off. They thaw very quickly, especially after being washed. I do like to dry the berries if I'm adding them to a dough or batter of some kind. I just pat them dry with a paper towel.
   So go pick some blueberries and enjoy them all year! Just be sure to remind your children (and husband) to wash them before eating them straight from the freezer!

Chocolate Chip Cookies


Chocolate Chip Cookies   I have discovered the perfect after school treat... hot from the oven homemade cookies! No, I haven't been baking a batch of cookies every day, but I did bake several batches, and freeze the unbaked cookie dough balls. Now when it is almost time for my children to be home from school, I bake one pan of cookies. Easy as pie, I have hot fresh cookies.
   So instead of dragging up the hill after school, my children race up the hill to get to the cookies first!
   We have found that we like the cookies better when made from the frozen dough balls. The centers are a little softer and gooey! Check out the instructions under the "Notes" at the end of the recipe to learn how to freeze your cookie dough balls.

Chocolate Chip Cookies
Ingredients:
   ½ cup butter
   ¼ cup sugar
   ½ cup brown sugar
   1 teaspoon vanilla
   1 egg
   1 teaspoon soda
   1¼ cups flour
   1 cup milk chocolate chips
   1 cup chopped nuts
Preheat oven to 375 degrees F. Cream together butter and sugars. Add vanilla, eggs, & soda and mix well. (If using unsalted butter, add ¼ teaspoon salt.) Add flour and mix well. Stir in chocolate chips and nuts. Drop dough by tablespoon (small cookie scoop) on ungreased cookie sheet. Bake at 375 degrees for 9 to 10 minutes, or until golden brown. Makes about 30 cookies.

Baked Chocolate Chip CookiesNotes:
   You can make a "pizza" (or cake) cookie by placing all the dough on a parchment covered 15 inch baking stone. Spread dough out until it is about ⅜ inch thick. Bake at 375 degrees F for 15 minutes. Makes one cookie. To give as a gift, cut the parchment paper that the cookie is on to fit inside a large pizza box. Remove parchment and cookie and place them in a pizza box. Decorate with frosting and mini M&M's.
   You can also make giant cookies with the large (3 Tbsp) cookie scoop. Spread dough out until about ⅜ inch thick. Bake at 375 degrees for 15 minutes. Makes about 10 cookies. These make great gifts! Just wrap each cookie individually with plastic wrap. If you are giving a single cookie as a gift, place a fun circular label with your message in the center of each cookie. If you are giving several cookies, place them in a cute basket and add a bow!
   You can freeze cookie dough balls prior to baking. Place balls on a tray lined with parchment paper. Place tray in freezer until balls are frozen solid. (A deep freezer works much faster than the regular freezer.) Place frozen balls in a gallon freezer Ziplock bag removing as much air as possible and label it.

Frozen cookie dough ballsThese will be good for about 6 weeks in the freezer. When ready to bake, place frozen balls on cookie sheet.
Frozen cookie dough balls on the baking panBake at 375 degrees for 13-15 minutes, or until golden brown.